TARGIT can now delegate user authentication to external identity providers such as Azure, ADFS, Google etc.
OpenID is increasingly becoming a standard for user authentication. Organizations that already embrace this technology will be delighted to learn that TARGIT now also supports this.
Disclaimer: Administrators working with setting TARGIT up for OpenID user authentication will need to know in advance how to work with the interface of the external identity provider of choice.
Overview
When you add a new external identity provider to your TARGIT solution, these are the general steps to take:
- TARGIT needs to be registered as an Application with the external identity provider.
- As part of the application registration process, you will get the Client ID and the Client Secret that are necessary for the TARGIT server to communicate with the external identity provider.
- When the application registration is completed, the TARGIT server will also need to know about the Authorization Endpoint, the Token Endpoint and the Scope. TARGIT offers OpenID Discovery, which, with a single key, will automatically insert all of these properties. Alternatively, copy these properties – one by one – from the external Identity provider.
- The external identity provider will in return need to know the URIs of the Anywhere component and the TARGIT Server. These URIs are available as soon as you have set up the external identity provider in TARGIT Management.
- The AD groups from the external identity provider must be mapped with the Windows AD groups in the domain where the TARGIT server is installed. The mapping is done via a script that is connected to the added identity provider in the TARGIT Management client.
Requirements
Before adding an external identity provider, make sure that Public URLs for the TARGIT Server and the Anywhere component are set up correctly. This is done in the TARGIT Management client, in Setup / Back-end:
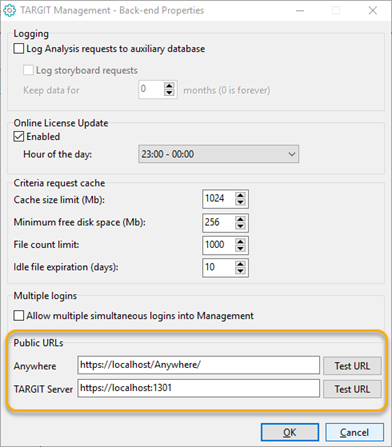
Note: Replace “localhost” with the correct server name or IP address within your organization. Also note that the Anywhere component (on the IIS) and the TARGIT server are not necessarily installed on the same server.
Adding a new Identity Provider
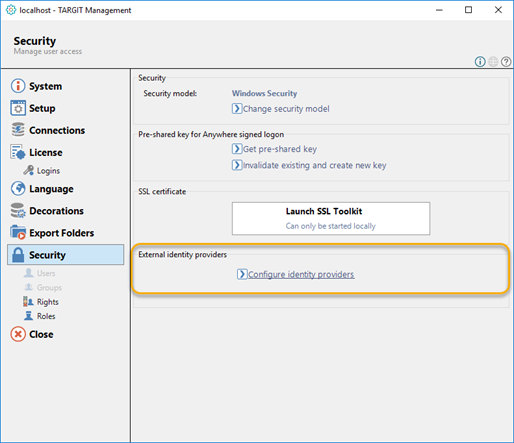
The OpenID authentication method has become a new option in the TARGIT Management client’s Security settings:
The Identity Providers dialog lets you add one or more identity providers to the list.
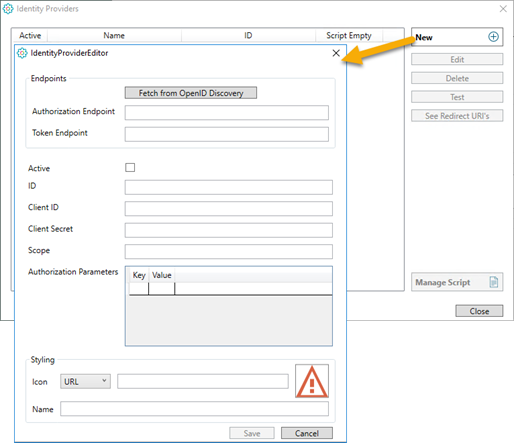
When you add a new Identity Provider, you must fill in its’ settings in the IdentityProviderEditor dialog:
- Fetch from OpenID Discovery: This is an option to fill some of the other fields automatically. E.g. in an Azure Active Directory, App Registrations you will have an Endpoint called OpenID connect metadata document. This Endpoint can be copied and pasted and used to fetch some of the other settings (or they can be copied/pasted individually):
- Authorization Endpoint
- Token Endpoint
- Scope
- Authorization Parameters
- Active: You have an option to disable (= not active) an identity provider. This will prevent end-users from using that particular login method.
- ID: The ID is a name/ID you give to this Identity Provider setting. The ID will become part of the URI strings.
- Client ID: On the external identity provider, TARGIT is registered as an application with a Client ID (sometimes called an Application ID.
- Client Secret: The Secret (i.e. password) for the registered client is revealed during the application registration. Important: On Azure (and potentially other external identity providers) it is not possible to see the Secret after registration is completed.
Example on a filled in Identity Provider for Azure OpenID:
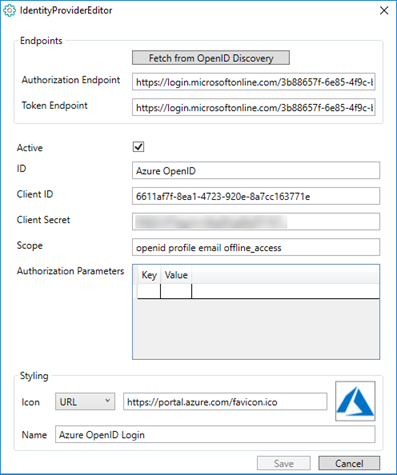
- Styling, Icon and name: You can upload or point to an image that you want to associate with this Identity Provider, and you can give it a name.
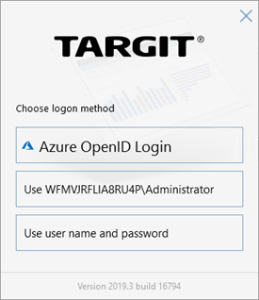
The icon and the name is what the end-user will see when logging on to a TARGIT client.
Scripts
An Identity Provider’s associated script is essential for, at least, the mapping between the external identity provider’s AD users and groups and the internal AD users and groups.
You will need to know the SIDs from both sides.
Example on a script related to an Azure OpenID identity provider:
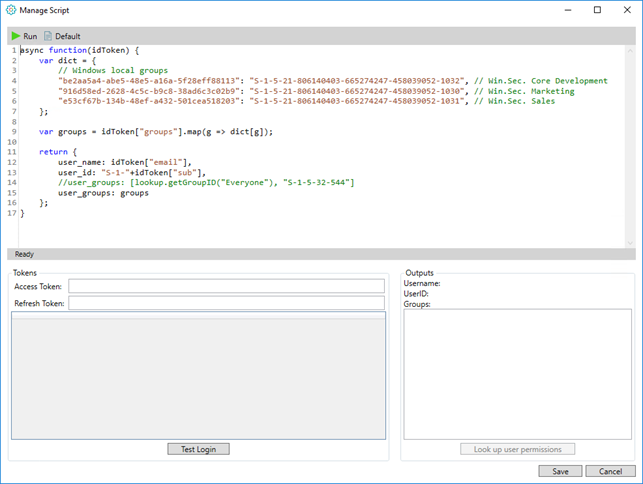
Use the “Test Login” option to login as one of the authenticated users. The information you get in return can be used for filling parts of your script, e.g. a group SID.
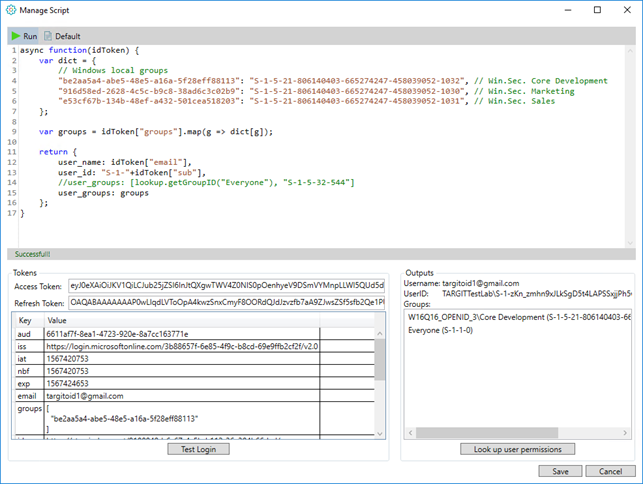
Furthermore, once you have done a Test Login and potentially modified your script, you can then “Run” the script. This will do the mapping and, in Outputs, give you additional information about the user, based on the internal AD.
Now that this user has been mapped from an external identity provider group to an internal AD group (and assuming that internal AD groups already have been added to TARGIT roles), you can then Look up user permissions to get an overview of the user’s effective permissions with regard to access to documents folders, databases, forced criteria etc.
Identity Provider Management
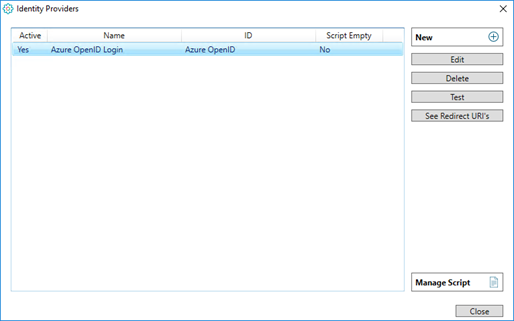
For an existing identity provider, you may:
- Edit the identity provider.
- Delete the identity provider.
- Test the identity provider. (Login with a user already set up on the external identity provider.) A successful test indicates that the TARGIT server and the external identity provider were able to exchange authentication information as expected.
- See Redirect URIs. These are the two redirect URIs (for TARGIT server and Anywhere) that must be fed back to the external identity provider’s list of authenticated URIs.
Appendix – solution description, technical
The solution is based on OpenID Connect, where the user's identity is encoded in a secure JSON Web Token (JWT), called an ID token, based on the standard OAuth 2.0 flow.
The ID token resembles the concept of an identity card, in a standard JSON Web Token (JWT) format, signed by the Identity Provider. An ID token has a limited lifetime (e.g. 30 minutes), so a Refresh token is also provided that can be used to query for a new ID token. The Refresh Token will be necessary for e.g. running scheduled jobs, because we "simulate" a user login.
Authentication will take place at the Identity Provider in two steps.
First step is to request an Authorization Code from the Identity Provider, for that the TARGIT client will use a trusted agent (browser) separate from the TARGIT application. The browser (standard system browser) will handle the dialogue that send the End-User to the chosen Identity Provider.
At the Identity Provider, the End-User will typically be authenticated by checking if they have a valid session (established by a browser cookie), and in the absence of that, by prompting the user to login. After that the user will typically be asked whether they agree to sign into TARGIT.
The TARGIT client will pass the Authorization Code to the TARGIT Server which in step two will do a “back-end” authorization against the Identity Provider, and in exchange for the Authorization Code receive an ID token and the Refresh token. The ID token will be security validated by TARGIT
Functionality TARGIT Management:
In TARGIT Management there will be added an additional security model “OpenID”.
In the “OpenID” security model you will be able to specify/“add” which Identity Provider that you want to trust. For custom Identity Provider you will be able to define a URL with the address of the custom Identity Provider and request parameters in the URI query.
To integrate OpenID into our rights/role-based security model, it should be possible to define certain rules on each right/role that determine if the right/role will be active for a given user. These rules could be something like: if the value of claim x equals y, then this right/role should be active. The administrator can then create several rights/roles that defines what each user can do - based on the contents of their ID token.
Functionality TARGIT Client:
When an end-user log into TARGIT, the TARGIT Client should be responsible for launching the browser to initiate the OpenID connect login. When an Authorization Code is received, it should be handed to the TARGIT Server where the actual token handling takes place.
Functionality TARGIT Server:
The TARGIT Server will be the only one knowing the client secret, therefore the actual handling of the ID token and Refresh Token will take place here. Each right and role will be checked to see if any of the OpenID rules are met. After rights and roles have been determined, we will issue our own security token to the TARGIT Client to be used internally.
Appendix – example Azure App Registration
In this example, you already have an Azure portal account and your Azure AD is already set up with a number of users and groups.
Azure:
- Log on to your Azure portal, e.g. http://portal.azure.com
- Go to Azure Active Directory
- Go to App Registrations
- Add a New registration
i. Apply a proper name (can be changed later) and Register
ii. Copy and store the Application (client) ID. You will need this later.
- Go to Certificates and Secrets
- Add a New client secret. Copy and store the client secret – you will not be able to retrieve it later.
- Go to API permissions
- Add a permission:
i. Microsoft Graph
ii. Delegated permission
iii. Checkmark Group.Read.All
iv. Click the Add permissions button at bottom.
- Go to Manifest
- Change groupMembershipClaims value to “All” (notice double quotation marks):
i. "groupMembershipClaims": "All",
- Go to Overview, Endpoints
- Copy to clipboard: OpenID Connect metadata document
TARGIT:
- Create a New Identity Provider
- Click ”Fetch from OpenID Discoverer”. This should automatically insert the copied URL.
- Click “Fetch”. This should automatically fill in
i. Authorization Endpoint
ii. Token Endpoint
iii. Scope
- Enable “Active”
- Provide an ID of your choice, e.g. “CompanyAzureID”
- Paste in the previously stored Client ID and Client Secret.
- Setup Styling Icon and Name of your choice.
- Save the Identity Provider setup.
- In the Identity Provider list, select the recently created provider.
- Click “See Redirect URIs”
Azure:
- Go to Authentication
- Paste in the two Redirect URIs as two separate entries – Type: Web.
Iteration with Totals:
Iteration with Subtotals and 'Single' Dynamic content:
Iteration with Hierarchy and with Visibility agent:
Iteration on multi-page report:
Different Iterations on different pages:
Generic Embedding
With Generic Embedding we have made it a lot easier to embed the TARGIT Anywhere client in one of your Business Systems.
The idea is, that you do not need to know the exact URL that TARGIT Anywhere requires in order to open the right document with the right criteria. Instead, in the assigned frame in your Business System, you create your own Permalink - something that makes sense to you and your Business System. Then, in the TARGIT Windows client, these Permalinks are mapped in a user-friendly interface to their corresponding documents and dimensions.
Generic Embedding from unknown Permalink:
Generic Embedding from pre-configured Permalink:
Tabs
With Tabs you can open multiple documents in one client, rather than opening multiple clients with one document each.
As a Designer user you will benefit from this when:
- Copying content (objects) from one document to another.
- Comparing documents, to ensure a consistent and cohesive look and feel.
As a Consumer user you will benefit from this when:
- Working with related documents.
- Multi-selected documents can be opened as individual tabs.
- Tabbed documents can be saved and reopened as one Bookmark.
- Triggered documents can be opened in new tabs.
- Working with related documents.
Tabs, general functionality and saving tabs as a bookmark:
Multi-select documents and open in tabs. User preference settings:
Open triggered document in new tab:
Scheduled Publishing
Publish and update your Dashboards and Slideshows as browser accessible HTML pages.
With Scheduled Publishing you can render Dashboards, Slideshows and Reports in "offline" mode. (Reports are rendered as PDF documents.)
End-users do not need a TARGIT client to view Dashboards and Reports.
All they need is a browser and the right URL. Even though these Dashboards are non-interactive (no filters, no drills, no triggers), end-users will be able to scroll large crosstabs.
Note: End-users are not authenticated when browsing the HTML output. I.e. everyone with access to the URL will see the same content.
Slideshows no longer need a TARGIT client to run on monitors.
The monitor simply needs a browser with the right URL to run the Slideshow.
When the HTML output is updated (e.g. every 10 minutes), the browser based Dashboards and Slideshows will automatically update as well.
Links
Scheduled Publishing uses links for publishing the output. Technically, the output is placed on the TARGIT Server, and the URL link points to this location.
When you administrate a Scheduled Publishing job, you can change the source document (e.g. replace a slideshow for a different slideshow) without changing the link. In this way, from your central list of scheduled jobs, you can manage what is being displayed on e.g. 15 wide-spread monitors around your organization.
You can even have multiple scheduled jobs publishing to the same link. E.g. one job publishes and updates a Slideshow every 10 minutes from 8:00 to 16:50. Another job publishes a dashboard to the same link at 17:00.
Administration
Scheduled Publishing only adds workload on the TARGIT server and the Data Warehouse when the output is published and updated. Most of the end-users' workload is handled by the browser, which furthermore is often heavily cached. This behavior has a positive effect on the robustness on published content:
- If the IIS (with the Anywhere component) stops, the published content will still be available, but will not be updated.
- If the TARGIT server stops, the published content will still be available, but will not be updated.
- If the Scheduled Publishing job is disabled, the published content will still be available, but will not be updated.
- Only if scheduled job is deleted, the server will remove the link and the published content will no longer be available.
Setting up a Scheduled job for a Published link, (and first-time configuration of the Anywhere URL in TARGIT Management Studio):
Changing the source document for a Scheduled Publishing link:
Scheduled Publishing of Slideshow with custom link:
Easy Central Management of Scheduled Publishing jobs:
Two or more scheduled jobs publishing to the same link:
What happens if you change a publishing link? (Or the scheduled job is deleted, or the scheduled job hasn't run yet):
Drill History
In previous versions of TARGIT you would be able to activate the so-called "Drillpad" in your Smartpad.
From this version on, the Drillpad is history.
Instead, you will be able to explore your Drill History (including opening of documents, applying global criteria etc.) using the Back and Forward buttons in the upper right corner of the TARGIT Windows client.
Furthermore, right-clicking any of these buttons will provide easy access to any point in your Drill History.


