OpenID user authentication (TARGIT 2019 Update 3 feature)
TARGIT can now delegate user authentication to external identity providers such as Azure, ADFS, Google etc.
OpenID is increasingly becoming a standard for user authentication. Organizations that already embrace this technology will be delighted to learn that TARGIT now also supports this.
Disclaimer: Administrators working with setting TARGIT up for OpenID user authentication will need to know in advance how to work with the interface of the external identity provider of choice.
Overview
When you add a new external identity provider to your TARGIT solution, these are the general steps to take:
- TARGIT needs to be registered as an Application with the external identity provider.
- As part of the application registration process, you will get the Client ID and the Client Secret that are necessary for the TARGIT server to communicate with the external identity provider.
- When the application registration is completed, the TARGIT server will also need to know about the Authorization Endpoint, the Token Endpoint and the Scope. TARGIT offers OpenID Discovery, which, with a single key, will automatically insert all of these properties. Alternatively, copy these properties – one by one – from the external Identity provider.
- The external identity provider will in return need to know the URIs of the Anywhere component and the TARGIT Server. These URIs are available as soon as you have set up the external identity provider in TARGIT Management.
- The AD groups from the external identity provider must be mapped with the Windows AD groups in the domain where the TARGIT server is installed. The mapping is done via a script that is connected to the added identity provider in the TARGIT Management client.
Requirements
Before adding an external identity provider, make sure that Public URLs for the TARGIT Server and the Anywhere component are set up correctly. This is done in the TARGIT Management client, in Setup / Back-end:
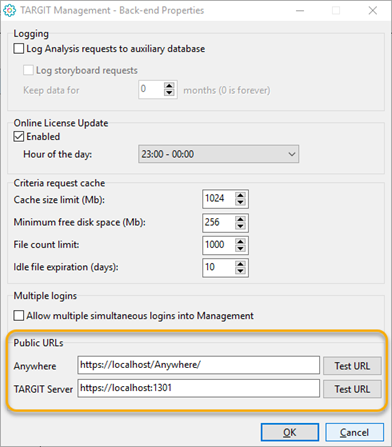
Note: Replace “localhost” with the correct server name or IP address within your organization. Also note that the Anywhere component (on the IIS) and the TARGIT server are not necessarily installed on the same server.
Adding a new Identity Provider
The OpenID authentication method has become a new option in the TARGIT Management client’s Security settings:
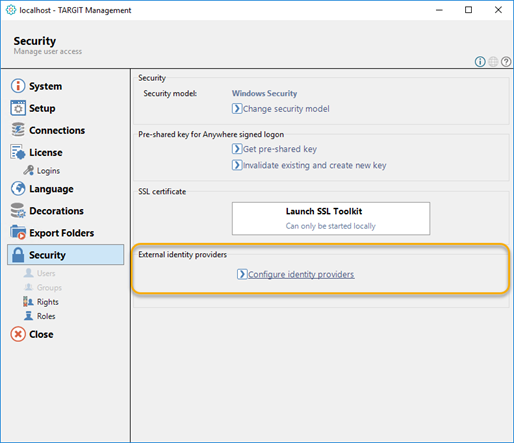
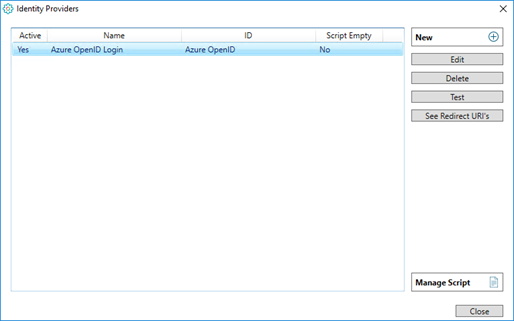
The Identity Providers dialog lets you add one or more identity providers to the list.
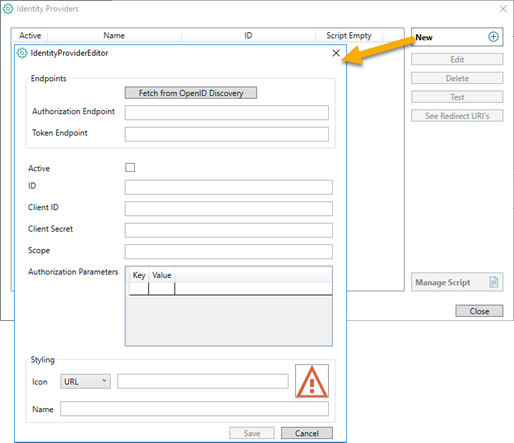
When you add a new Identity Provider, you must fill in its’ settings in the IdentityProviderEditor dialog:
- Fetch from OpenID Discovery: This is an option to fill some of the other fields automatically. E.g. in an Azure Active Directory, App Registrations you will have an Endpoint called OpenID connect metadata document. This Endpoint can be copied and pasted and used to fetch some of the other settings (or they can be copied/pasted individually):
- Authorization Endpoint
- Token Endpoint
- Scope
- Authorization Parameters
- Active: You have an option to disable (= not active) an identity provider. This will prevent end-users from using that particular login method.
- ID: The ID is a name/ID you give to this Identity Provider setting. The ID will become part of the URI strings.
- Client ID: On the external identity provider, TARGIT is registered as an application with a Client ID (sometimes called an Application ID.
- Client Secret: The Secret (i.e. password) for the registered client is revealed during the application registration. Important: On Azure (and potentially other external identity providers) it is not possible to see the Secret after registration is completed.
- Fetch from OpenID Discovery: This is an option to fill some of the other fields automatically. E.g. in an Azure Active Directory, App Registrations you will have an Endpoint called OpenID connect metadata document. This Endpoint can be copied and pasted and used to fetch some of the other settings (or they can be copied/pasted individually):
Example on a filled in Identity Provider for Azure OpenID:
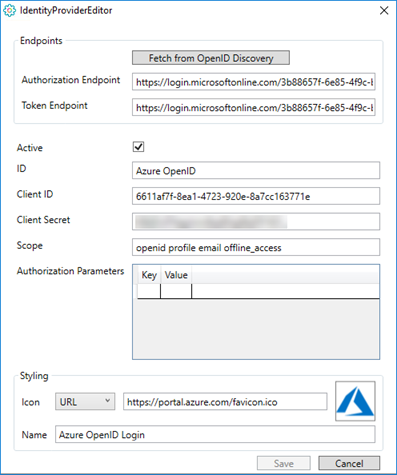
- Styling, Icon and name: You can upload or point to an image that you want to associate with this Identity Provider, and you can give it a name.
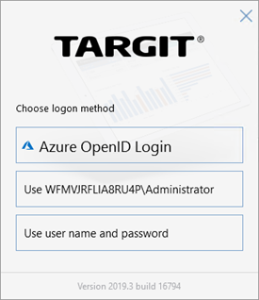
The icon and the name is what the end-user will see when logging on to a TARGIT client.
Scripts
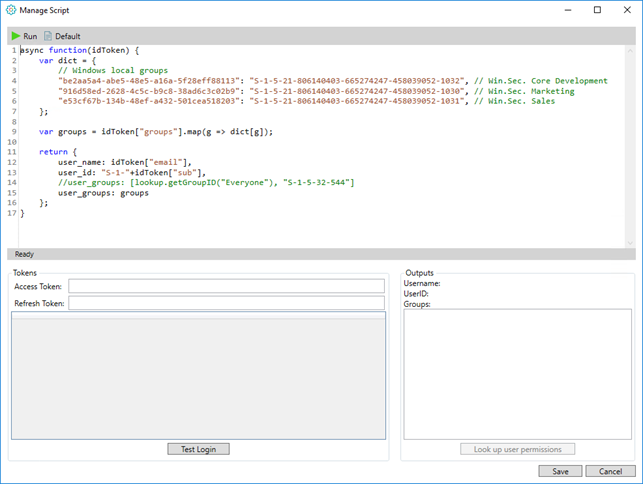
An Identity Provider’s associated script is essential for, at least, the mapping between the external identity provider’s AD users and groups and the internal AD users and groups.
You will need to know the SIDs from both sides.
Example on a script related to an Azure OpenID identity provider:
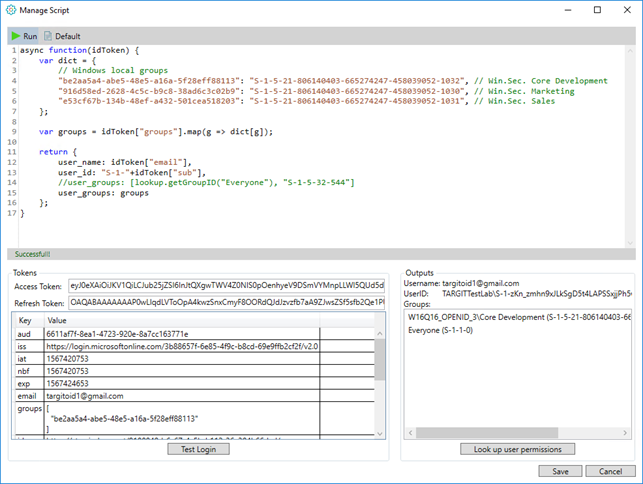
Use the “Test Login” option to login as one of the authenticated users. The information you get in return can be used for filling parts of your script, e.g. a group SID.
Furthermore, once you have done a Test Login and potentially modified your script, you can then “Run” the script. This will do the mapping and, in Outputs, give you additional information about the user, based on the internal AD.
Now that this user has been mapped from an external identity provider group to an internal AD group (and assuming that internal AD groups already have been added to TARGIT roles), you can then Look up user permissions to get an overview of the user’s effective permissions with regard to access to documents folders, databases, forced criteria etc.
Identity Provider Management
For an existing identity provider, you may:
- Edit the identity provider.
- Delete the identity provider.
- Test the identity provider. (Login with a user already set up on the external identity provider.) A successful test indicates that the TARGIT server and the external identity provider were able to exchange authentication information as expected.
- See Redirect URIs. These are the two redirect URIs (for TARGIT server and Anywhere) that must be fed back to the external identity provider’s list of authenticated URIs.
Appendix – solution description, technical
The solution is based on OpenID Connect, where the user's identity is encoded in a secure JSON Web Token (JWT), called an ID token, based on the standard OAuth 2.0 flow.
The ID token resembles the concept of an identity card, in a standard JSON Web Token (JWT) format, signed by the Identity Provider. An ID token has a limited lifetime (e.g. 30 minutes), so a Refresh token is also provided that can be used to query for a new ID token. The Refresh Token will be necessary for e.g. running scheduled jobs, because we "simulate" a user login.
Authentication will take place at the Identity Provider in two steps.
First step is to request an Authorization Code from the Identity Provider, for that the TARGIT client will use a trusted agent (browser) separate from the TARGIT application. The browser (standard system browser) will handle the dialogue that send the End-User to the chosen Identity Provider.
At the Identity Provider, the End-User will typically be authenticated by checking if they have a valid session (established by a browser cookie), and in the absence of that, by prompting the user to login. After that the user will typically be asked whether they agree to sign into TARGIT.
The TARGIT client will pass the Authorization Code to the TARGIT Server which in step two will do a “back-end” authorization against the Identity Provider, and in exchange for the Authorization Code receive an ID token and the Refresh token. The ID token will be security validated by TARGIT
Functionality TARGIT Management:
In TARGIT Management there will be added an additional security model “OpenID”.
In the “OpenID” security model you will be able to specify/“add” which Identity Provider that you want to trust. For custom Identity Provider you will be able to define a URL with the address of the custom Identity Provider and request parameters in the URI query.
To integrate OpenID into our rights/role-based security model, it should be possible to define certain rules on each right/role that determine if the right/role will be active for a given user. These rules could be something like: if the value of claim x equals y, then this right/role should be active. The administrator can then create several rights/roles that defines what each user can do - based on the contents of their ID token.
Functionality TARGIT Client:
When an end-user log into TARGIT, the TARGIT Client should be responsible for launching the browser to initiate the OpenID connect login. When an Authorization Code is received, it should be handed to the TARGIT Server where the actual token handling takes place.
Functionality TARGIT Server:
The TARGIT Server will be the only one knowing the client secret, therefore the actual handling of the ID token and Refresh Token will take place here. Each right and role will be checked to see if any of the OpenID rules are met. After rights and roles have been determined, we will issue our own security token to the TARGIT Client to be used internally.
Appendix – example Azure App Registration
In this example, you already have an Azure portal account and your Azure AD is already set up with a number of users and groups.
Azure:
- Log on to your Azure portal, e.g. http://portal.azure.com
- Go to Azure Active Directory
- Go to App Registrations
- Add a New registration
i. Apply a proper name (can be changed later) and Register
ii. Copy and store the Application (client) ID. You will need this later.
- Go to Certificates and Secrets
- Add a New client secret. Copy and store the client secret – you will not be able to retrieve it later.
- Go to API permissions
- Add a permission:
- Go to Certificates and Secrets
i. Microsoft Graph
ii. Delegated permission
iii. Checkmark Group.Read.All
iv. Click the Add permissions button at bottom.
- Go to Manifest
- Change groupMembershipClaims value to “All” (notice double quotation marks):
- Go to Manifest
i. "groupMembershipClaims": "All",
- Go to Overview, Endpoints
- Copy to clipboard: OpenID Connect metadata document
- Go to Overview, Endpoints
TARGIT:
- Create a New Identity Provider
- Click ”Fetch from OpenID Discoverer”. This should automatically insert the copied URL.
- Click “Fetch”. This should automatically fill in
i. Authorization Endpoint
ii. Token Endpoint
iii. Scope
- Enable “Active”
- Provide an ID of your choice, e.g. “CompanyAzureID”
- Paste in the previously stored Client ID and Client Secret.
- Setup Styling Icon and Name of your choice.
- Save the Identity Provider setup.
- In the Identity Provider list, select the recently created provider.
- Click “See Redirect URIs”
Azure:
- Go to Authentication
- Paste in the two Redirect URIs as two separate entries – Type: Web.
- Go to Authentication
Working with Layouts
A Document may contain a number of different Layouts. You may start out by designing an analysis with a layout suitable for landscape mode on PC desktops.
Next, in the same document, using the same objects, you could add a new layout suitable for e.g. portrait mode on a Tablet.
Device Visibility
TARGIT will use a set of rules to detect which Layout it should open by default on a specific device type:
- TARGIT will open the first Layout (reading from top of list) that is Enabled, Designed for and matches the Orientation of the current device.
- If rule 1 fails, TARGIT will open the first Layout (reading from top of list) that is Enabled and matches the Orientation of the current device.
- If rule 1 and 2 fails, TARGIT will open the first Layout (reading from top of list) that is Enabled for the current device.
Free floating objects on canvas
Pixel-by-pixel control of object size and placement with the new free flow design capabilities.
Objects overlapping and transparency
The canvas supports overlapping and transparency for all objects so you can design how you want.
Align and Distribute tools
Easily align and distribute multi-selected objects with the new Align and Distribute tools. Object placement in the new TARGIT Canvas couldn’t be easier.
Crosstab Autofit
Crosstabs columns can be stretched to fit the size of crosstab object box.
You have three options for Autofitting:
- Autofit (stretches all columns equally)
- Autofit dimensions (stretches dimension columns while preserving measure column widths)
- Autofit measures (stretches measure columns while preserving dimension column widths)
Renaming objects in object list and Grouping
Host all your objects from a specific design in one list. Custom name each object for easy recognition and selection, such as according to type or content.
Object Scaling
Although most objects would automatically scale correctly when switching between layouts with different page sizes, you may occasionally want to work with some manual object scaling. This would usually be something to be considered when working with crosstabs or other objects containing text or labels.
Report Layout with Repeater page
The essence of adding data to a Report Layout - crosstabs, graphs, KPI objects etc. - is identical to that of adding data to a Dashboard Layout.
You can even have a Document with both layout types - Dashboard Layouts and Report Layouts - sharing objects from the Objects list.
Report Layouts differ from Dashboard Layouts mainly on these topics:
- Pages. A Report Layout may contain multiple pages with different layout and different content on each page. Pages can be of different sizes and formats.
- Repeater page. The Repeater page in a Report Layout repeats content on as many pages as necessary. E.g. a very long crosstab may need to be repeated (continued) across multiple pages to show all the data.
Multi-page report
A Report Layout may contain multiple pages with different layout and different content on each page. Pages can be of different sizes and formats.
Basic Templates
A template may contain as many objects as you like - even data objects.
In this video tutorial you will see how to create a very basic template - just with a specific page size - and how to save and use it.
For templates to be available, they must be saved in a folder that has been designated as a Templates folder.
Templates with Placeholders
A Placeholder object is an object you can add to a document with the purpose of later replacing it with another object – e.g. a chart or a crosstab.
In this way, a Placeholder object works very well with templates.
You can designate an area in your report that should later be replaced by a chart, a crosstab or any other type of object.
Basic User Dimensions
A User dimension is a dimension that is created by the end-user. The individual dimension members of a User dimension are defined from criteria from one or more standard dimensions.
Ignore criteria on User dimension elements
Each member in a user dimension can now be configured to ignore specific filters (dimensions) when they are applied through global criteria or through drills. This allows for a much more robust and flexible design of user dimension members.
Toggle Drill Down
Consumers can drill and remove drills by clicking the same area on an object. Removing a drill has never been easier.
Criteria range with Custom values
Now you can set up criteria as a dimension member range on hypothetical, non-existing dimension members. E.g. you could set up a criteria with an Account dimension member range from account number 8000 to account number 8999.
At the time of setting up the criteria, the account numbers '8000' and '8999' did not exist in your system, but you could anyway insert them as custom values. As you, in your accounting system, add more accounts in the range 8000 to 8999, they would automatically be picked up by this criteria range.
Download and Install TARGIT Decision Suite
This guide will tell you how to download and install the TARGIT Decision Suite Trial version. The Trial version includes all demo data and demo analyses that have been used throughout this E-Learning portal - so, with a similar installation on your own PC, you will be able to recreate the examples and try out the exercises of this portal.
Please bear in mind that the videos and exercises are based on a specific version of TARGIT - usually the latest version. If you run an earlier or a later version, your results may differ. E.g. if an exercise refer to a specific year, you may try with the previous year or the next year to get the same result.
For the record, there is no difference between a Trial version and a Production version, except that the Trial version will expire after 30 days.
Add or Remove components from the TARGIT installation
Simply run the installation file again if you want to modify your existing TARGIT installation.
Uninstall TARGIT Decision Suite
If you need to, you can uninstall the TARGIT Decision Suite by running the TARGITSetup.exe file again, or by uninstalling "TARGIT Decision Suite" via the Control Panel.
Slideshow
You can select a number of stored documents to be shown as a slideshow or to be exported as a PowerPoint document.
The Slideshow feature is an improved version of the previous Storyboard feature.


